In this guide, we’ll explore how Employee Management module Employment Types can help you master workforce management with ease.
Managing employees effectively is one of the biggest challenges for any business.
From tracking attendance and payroll to monitoring performance and streamlining communication, the process can quickly become complex without the right tools.
This is where an Aureus ERP comes in. With its centralized approach, ERP simplifies employee management, automates routine tasks.
It provides real time insights, helping businesses improve productivity and keep their workforce engaged.
The first step is setting up User Roles & Permissions in settings. This ensures accountability by giving the right access to the right people.
User Roles & Permissions
User Roles & Permissions ensure employee data stays secure by granting controlled access. To set this up:
Go to Settings >> Roles >> New Role, enable the required toggles, and create the role.

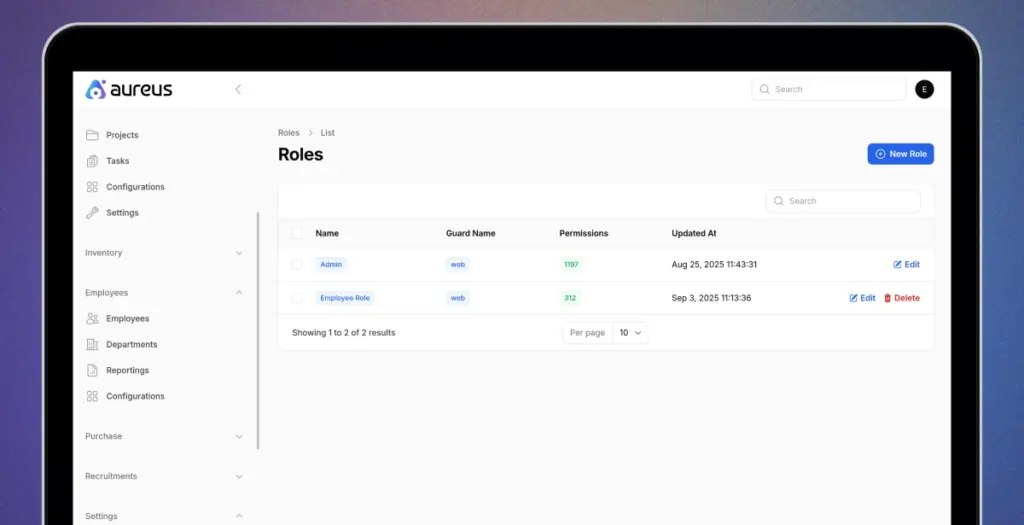
To provide access, roles should be configured by enabling the relevant toggles and assigning the necessary permissions.
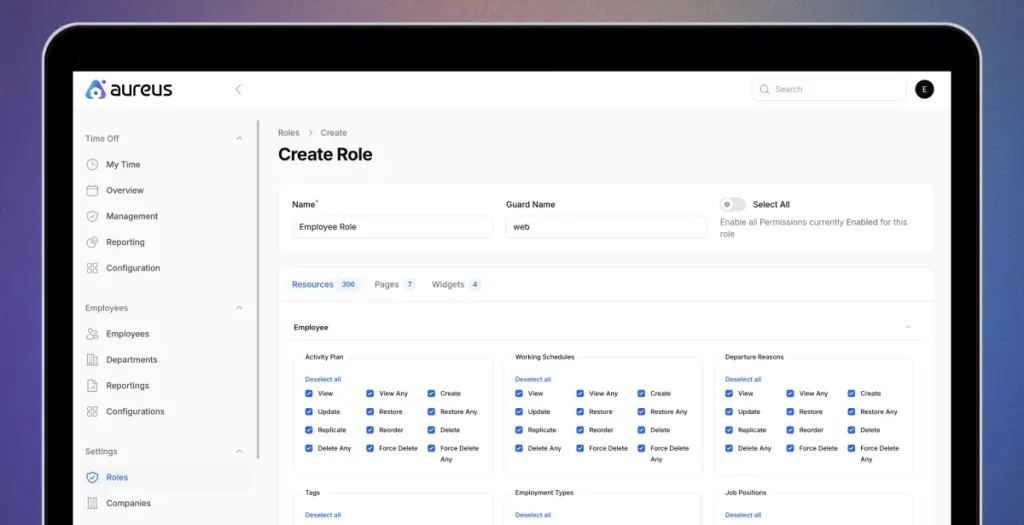
After assigning the necessary permissions in Roles,
Navigate to the Employee Plugin and open Configurations to enable all required permissions.
Configuration
Being an open source platform, Aureus ERP allows full customization, so businesses can configure job positions, schedules, employment types, and skills to match their policies for smoother HR operations.
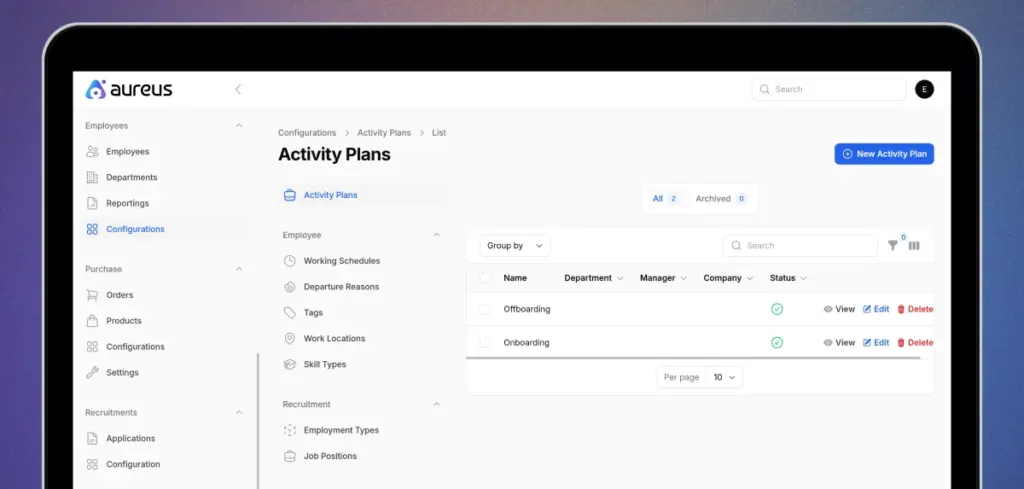
Activity Plans
The Activity Plans section under Employee Configuration is divided into two parts:
1) Employee
- Helps in tracking employee benefits, assigned roles, or internal activities
- Used for managing active plans related to existing employees.
2) Recruitment
- Focused on active plans created for hiring new candidates.
- Useful for managing recruitment cycles, job postings, and applicant workflows.
Steps to Create an Activity Plan
Step 1: Navigate to Employees >> Configurations >> Activity Plans >> New Activity Plans

Step 2: Fill in the required details:
- Name: Enter the title of the department.
- Department: Select or create the department it belongs to.
- Status: Define whether the department is active or inactive.
- Company: Choose the company associated with this department

Click on the create button to create a new activity plan.
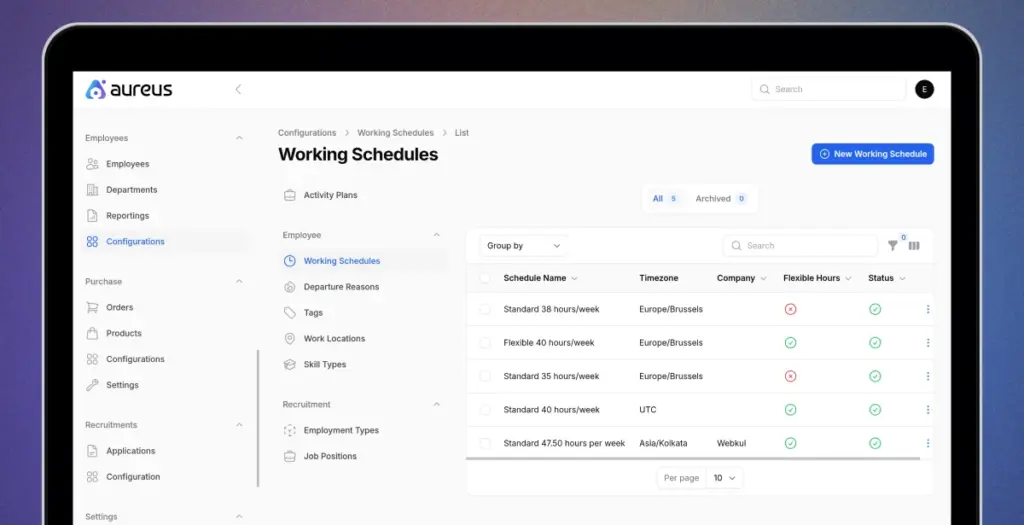
Working Schedules
Working Schedules define employee work hours, days, and flexibility options, supporting HR processes like attendance management, timesheets, and compliance.
Steps to Create a Working Schedule
Step 1: Navigate to Employees >> Configurations >> Working Schedules >> New Working Schedule.
Step 2: Fill in the required details:
- Schedule Name: Enter a name for the working schedule.
- Timezone: Select the time zone where the schedule applies.
- Company: Assign the schedule to a specific company.
- Hours Per Day: Define the daily working hours.
- Full Time Required Hours: Set the weekly requirement for full time status.
- Status: Activate or deactivate the schedule.

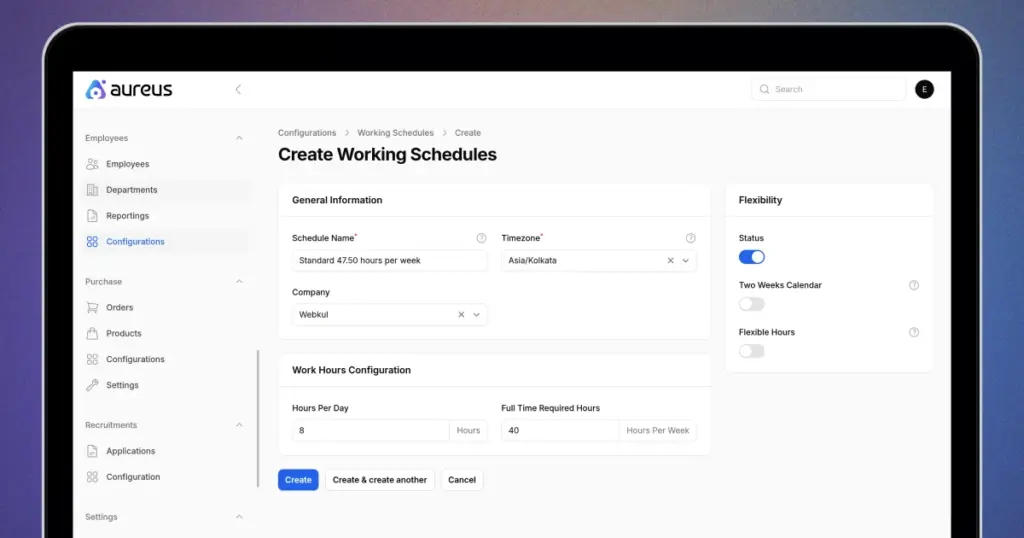
Click on the create button to create a new working schedules.
Departure Reasons
Departure Reasons are recorded when an employee leaves the company, helping with exit analysis and compliance.
Steps to Create a Departure Reason
Step 1: Navigate to Employees >> Configurations >> Departure Reasons >> New Departure Reason
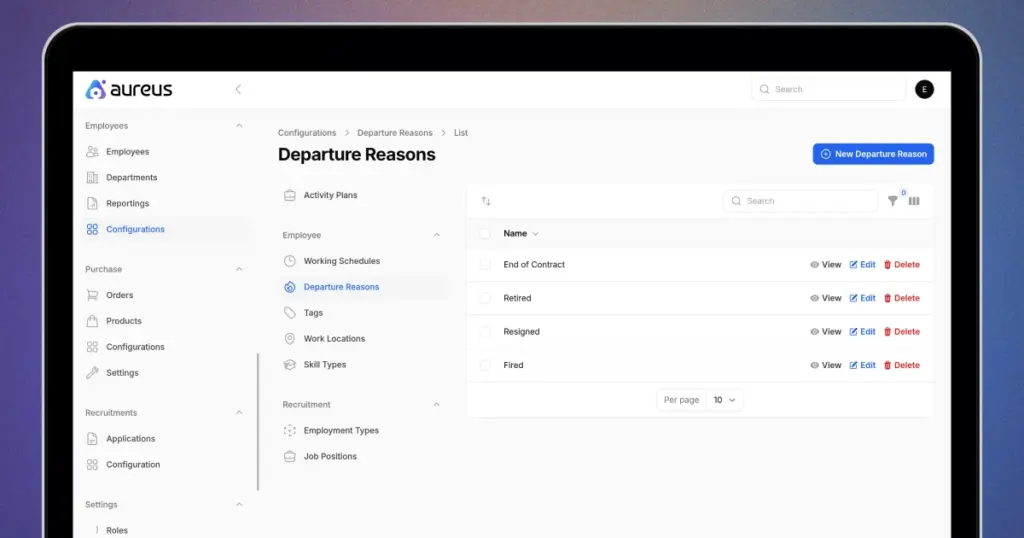
Step 2: Enter Name.
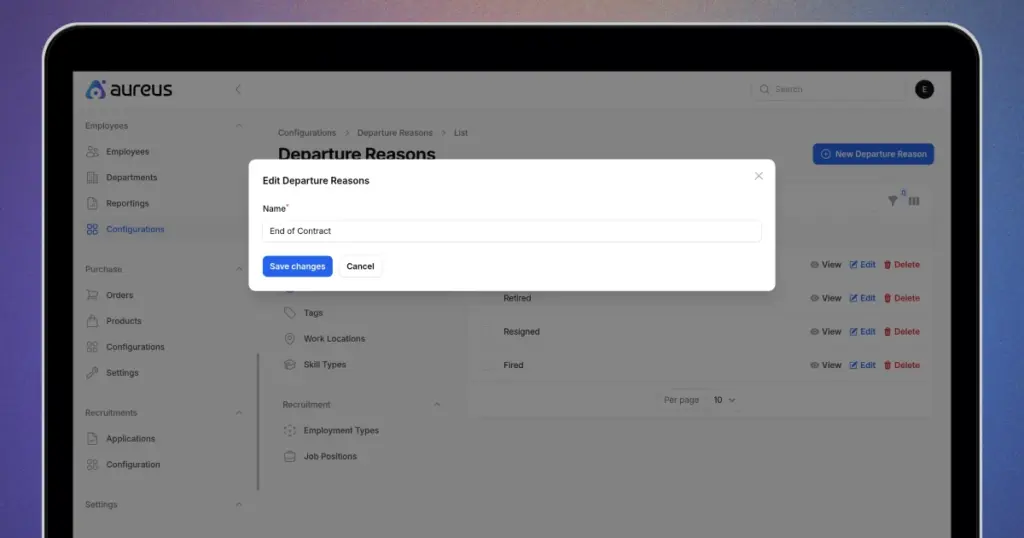
Click on Save changes button.
Tags
Tags help categorize employees for quick filtering.
Steps to Create a Tag
Step 1: Navigate to Employees >> Configurations >> Tags >> New Tag
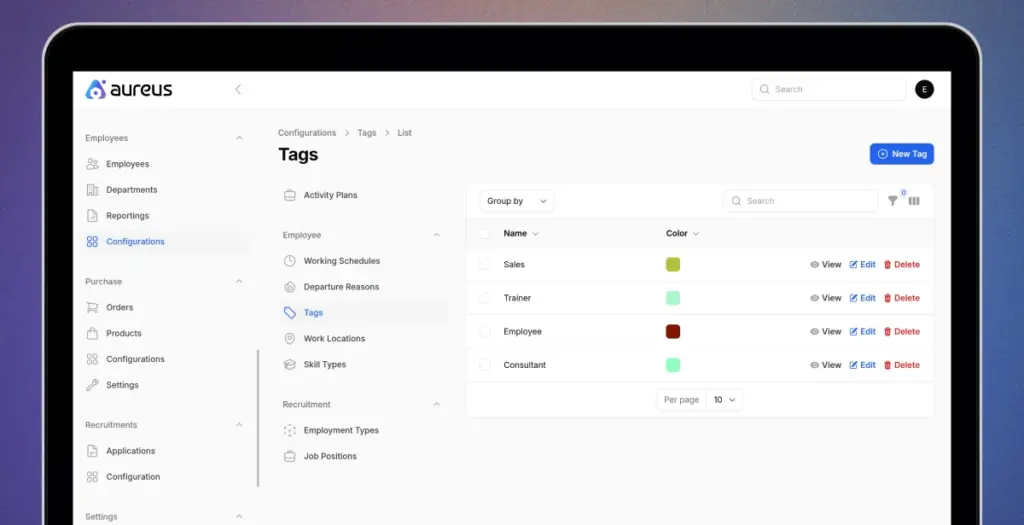
Step 2: Add a label and color code to categorize employees for easier search.
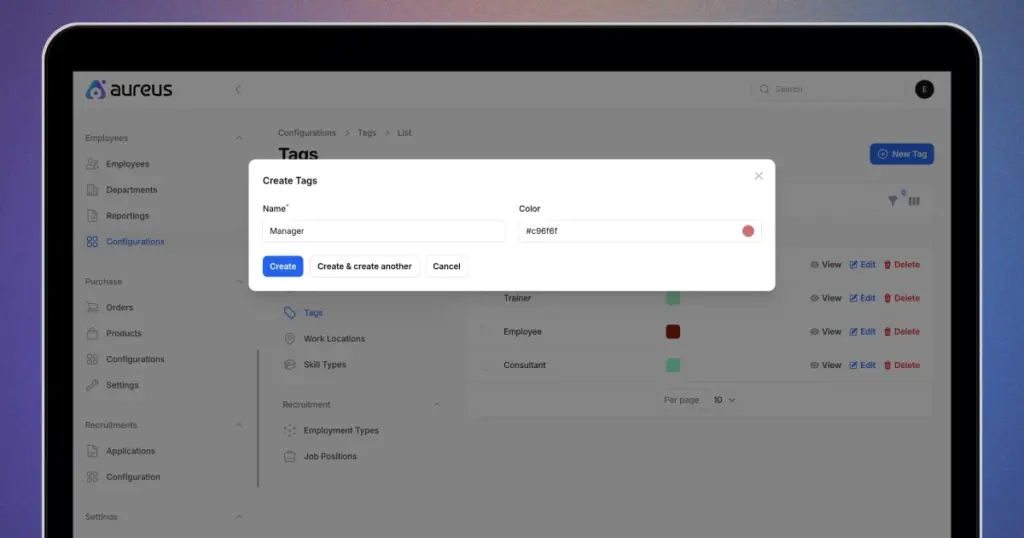
Click on the create button to create a new Tag.
Work Locations
Work Locations specify where employees perform their duties, supporting location based reporting and resource planning.
Steps to Create a Work Location
Step 1: Navigate to Employees >> Configurations >> Work Locations >> New Work Location
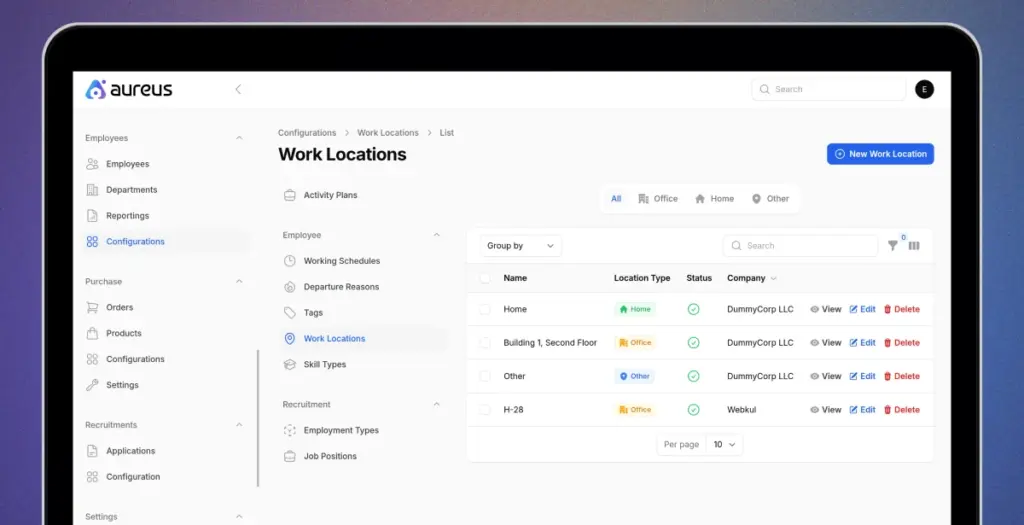
Step 2: Fill in the required details:
- Name: Enter a title to identify the location.
- Location Type: Specify whether it is home, office, or other.
- Company: Select the company associated with this location.
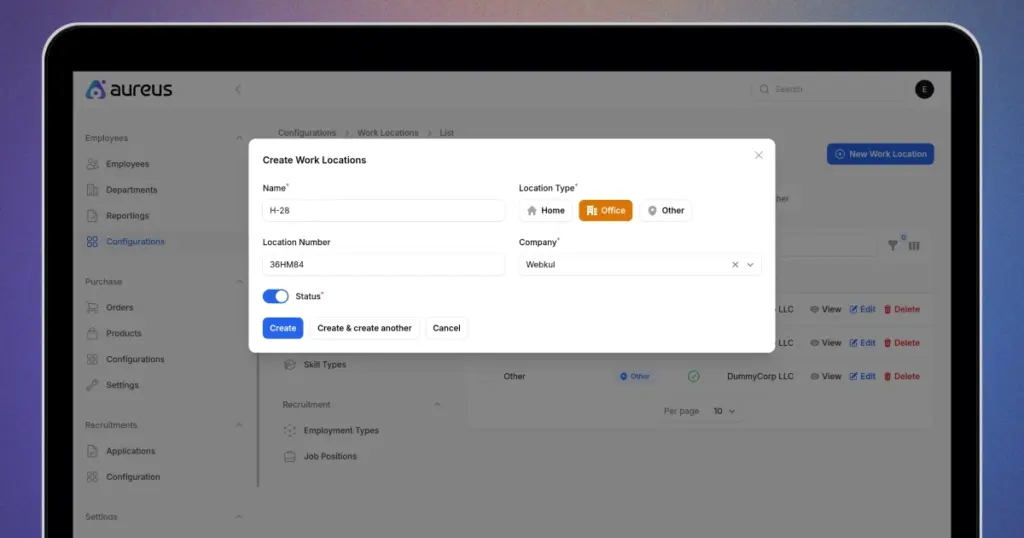
Click on the create button to create a new work location.
Skill Types
Skill Types are used to classify and organize various employee capabilities, helping businesses track expertise and manage workforce competencies effectively.
Steps to Create a Skill Type
Step 1: Navigate to Employees >> Configurations >> Skill Types >> New Skill Type
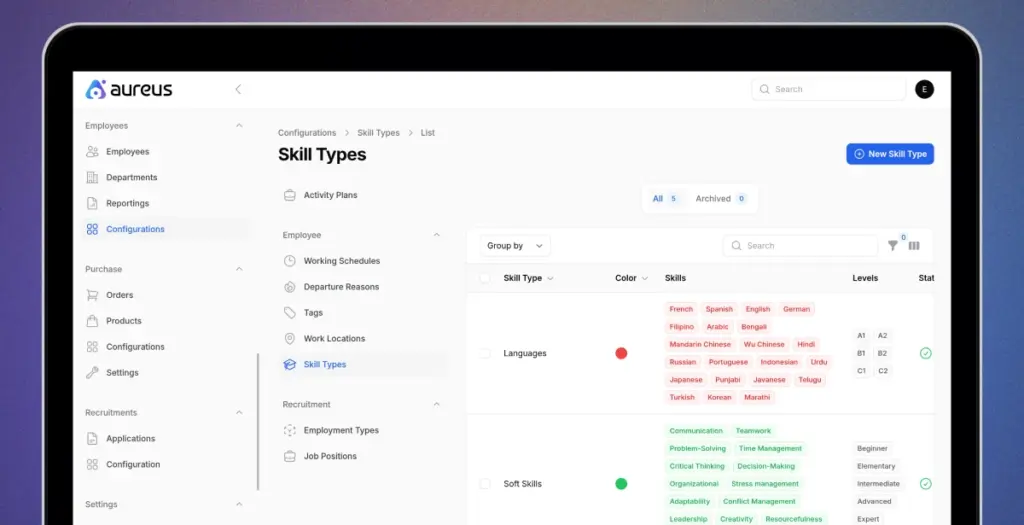
Step 2: Fill in the required details:
- Name: Enter the label or title for identification.
- Color: Assign a color for easy visual recognition.
- Status: Set whether it is active or inactive.
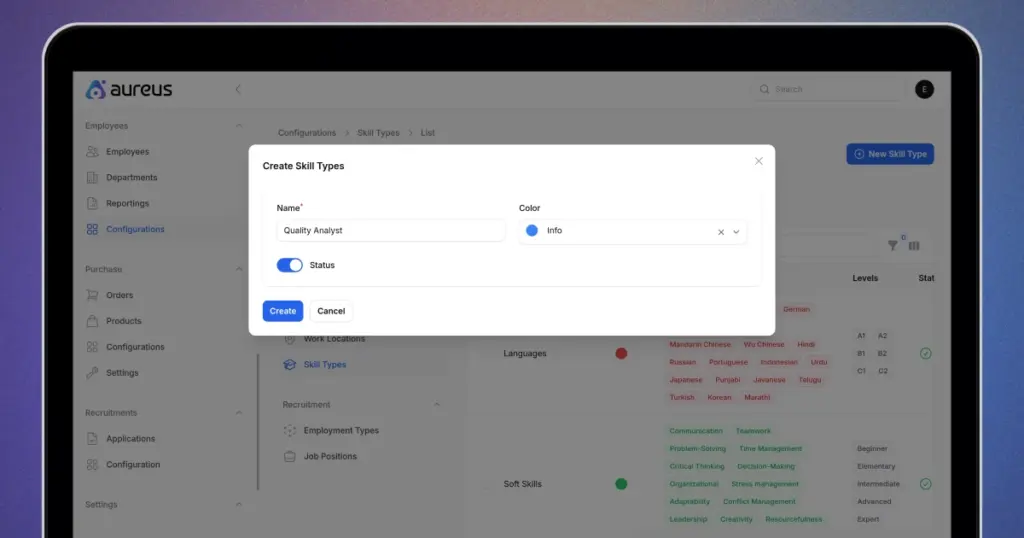
Click on the create button to save the changes.
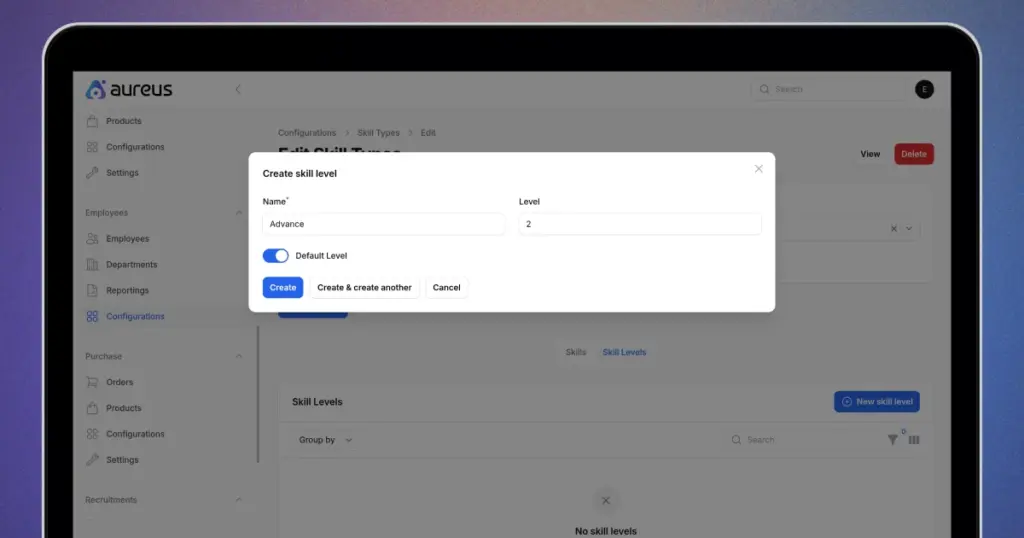
Step 3: Click New Skill, enter the name, and save by clicking Create.


Step 4: Click Create Skill Level and enter the required details before saving.
- Name: Enter the title of the skill level.
- Level: Define the proficiency stage.
- Default Level: Mark if this should be the default option.
- Create: Click to save the details.
Employment Types
Employment Types define job nature like Full Time, Part Time, and Internship.
Steps to Create an Employment Type
Step 1: Navigate to Employees >> Configurations >> Employment Types >> New Employment Type.
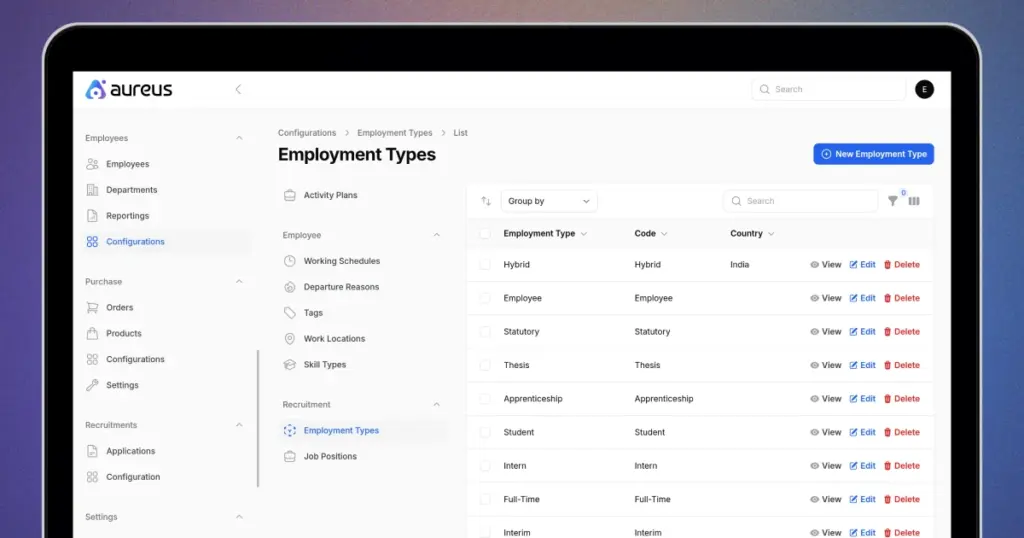
Step 2: Fill in the required details:
- Employment Type: Specify whether the role is full time, part time, or an internship.
- Country: Select the country where this employment type will be applicable.

Click on the create button to create a new employment types.
Job Positions
Job Positions define roles within the organization, such as Software Developer or HR Manager. They are used across employee and recruitment modules.
Steps to Create a Job Position
Step 1: Go to Employees >> Configurations >> Job Positions >> New Job Position.

Step 2: Fill in the required details:
- Job Position Title: Provide the name of the job position.
- Department: Select the department the role belongs to.
- Company: Choose the company where the position is available.
- Job Description: Add a summary of the role and responsibilities.
- Requirements: List the skills or qualifications needed.
- Recruitment Target: Define the number of hires required.
- Employment Type: Specify whether it is full time, part time, or internship.
- Status: Set whether the position is active or inactive.
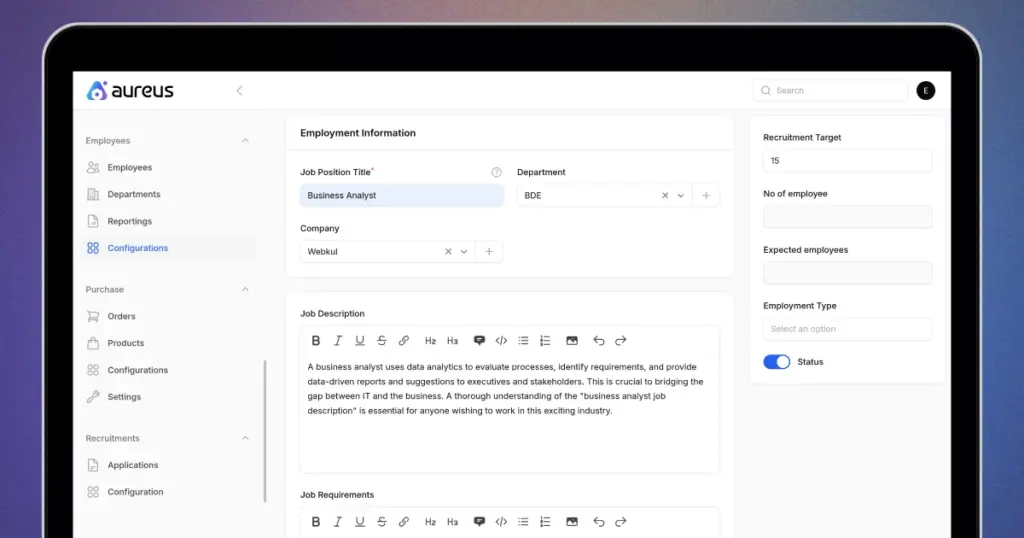
Click on the create button to create a new job position.
These configuration details help set up the Employees Plugin accurately, enabling HR to efficiently handle hiring, management, and talent retention in AureusERP.
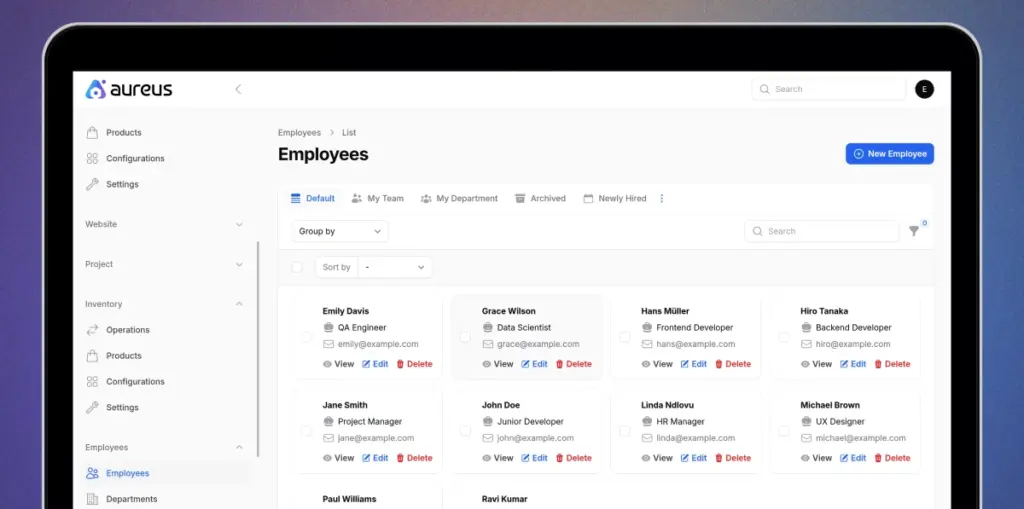
Getting Started with Employee Creation
Once permissions are configured, proceed to the Employee Plugin to create a new employee.
Add New Employee
The Employee Creation feature simplifies onboarding by capturing all necessary details in one place.
It tracks roles, departments, approvals, and personal information to ensure a complete record for each employee.
Create a New Employee
Step 1: Navigate to Employees >> Employees >> New Employee

Step 2: Fill in the required details:
- Department: Select the department where the employee works.
- Name: Full name of the employee.
- Job Title: Role or designation
- Work Email: Official email address used for internal communication.
- Job Position: Specify the role assigned to the employee within the organization.
- Work Mobile: Enter the employee’s official contact number for work related communication.
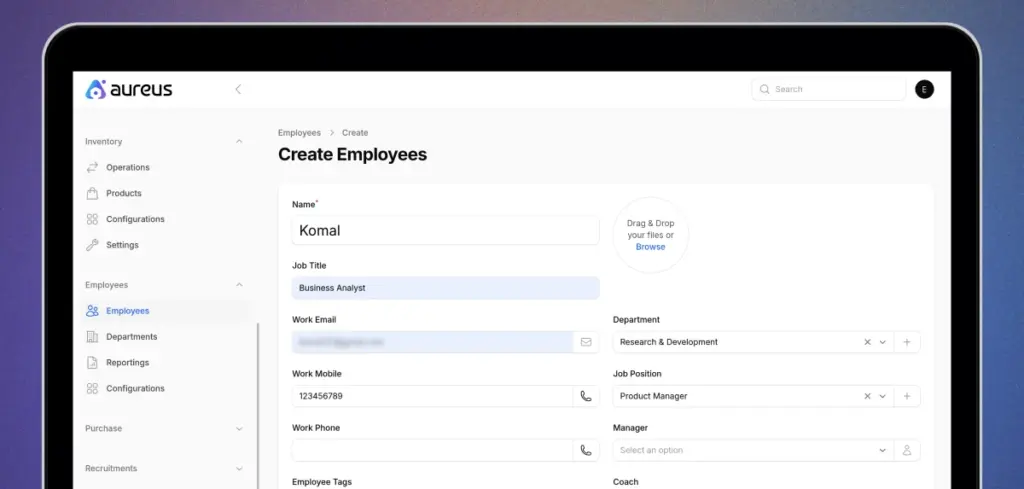
While creating a new employee, the process is divided into three main subsections:
- Work Information: Includes office address, location, organization details, approvers, and schedule.
- Settings: Defines user access, assigns roles, and links permissions to the employee profile.
- Private Information: Covers personal details such as home address, contact info, bank details, citizenship, family, education, and work permits.
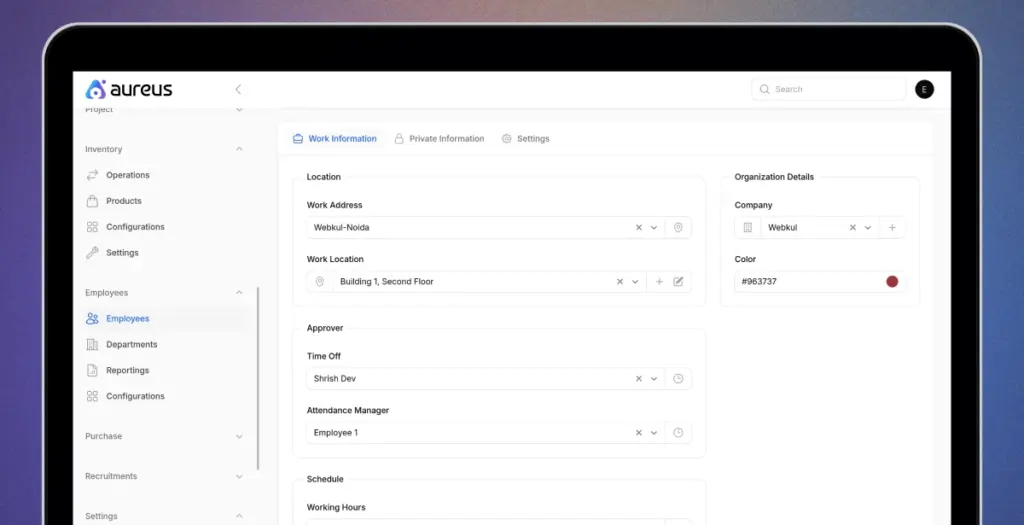
Work Information
Work Information captures details like job role, department, and reporting manager. It defines where an employee performs duties, helping track their base and reporting structure.
Organization Details
- Specify the company name to associate with the employee
- Add a color identifier to visually distinguish employees in reports and dashboards.
Approvers
- Assign approvers for time off requests.
- Define an attendance manager to maintain accountability and smooth workflows.
Schedule
- Set the employee’s working hours.
- Align schedules with the correct time zone.
- Use predefined schedules to ensure consistency across branches.
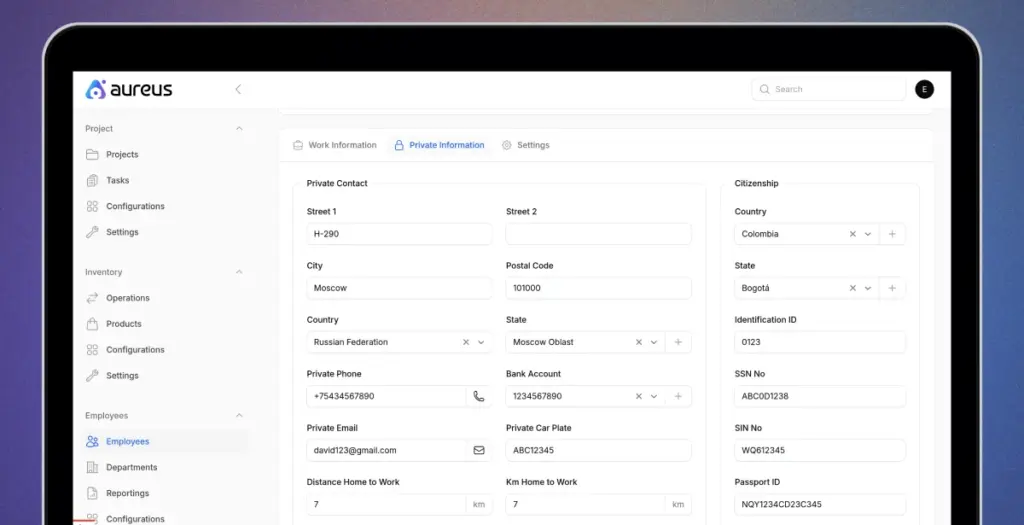
Private Information
- Maintain personal details like home address, bank account, private email, and emergency contact.
- Ensure smooth payroll processing, compliance, and communication.
Citizenship
- Record official IDs such as a passport, SSN, or work ID.
- Add gender, date of birth, and country of birth for legal documentation.
Emergency Contact
- Add a reliable contact person with phone details.
- Ensure employee safety during emergencies.
Family Details
- Specify marital status and family information.
- Support employee records and benefits processing.
Education
- Enter highest qualification, field of study, and institution name.
- Use details to support training and career growth.
Work Permit
- Capture visa or work permit numbers with validity dates.
- Upload supporting documents for compliance

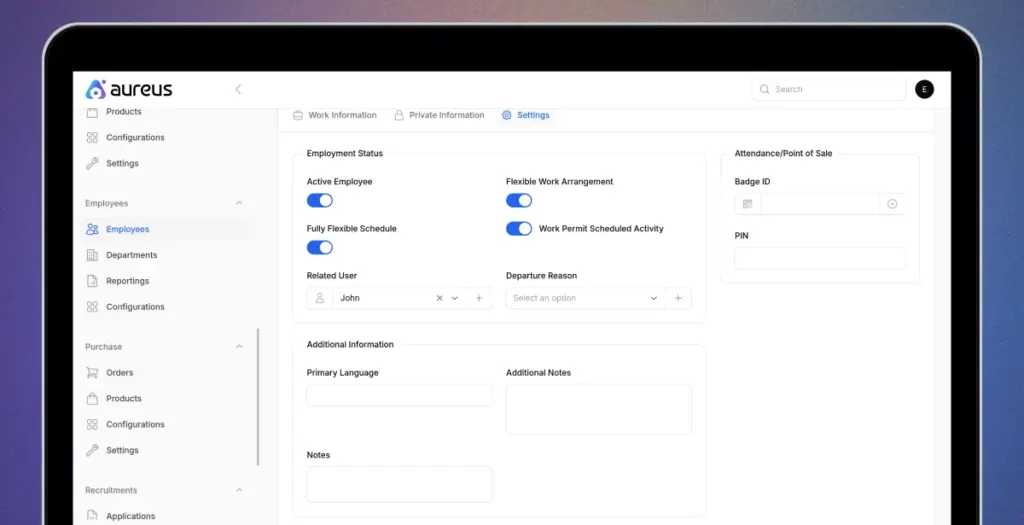
Settings:
In Settings, there are two sections:
1) Employee Status: Manage employment categories such as active, flexible arrangements, schedules, and departure reasons.
For each category under Employment Status:
- Active Employee: Marks the employee as currently working in the organization.
- Flexible Work Arrangement: Allows customized work setups like hybrid or part time.
- Fully Flexible Schedule: Gives complete freedom in managing work hours.
- Departure Reason: Records the reason when an employee exits the company.
- Work Permit: Tracks visa or permit details for compliance.
- Scheduled Activity: Defines recurring tasks or activities linked to the employee.
- Related User: Connects the employee profile with a system user for login access.
You can create a new user by clicking the plus (+) icon and filling in the required details.
- Name: Enter the user’s full name.
- Email: Provide the official email address.
- Password: Set a secure password for login access.
- Password Confirmation: Re enter the password to confirm accuracy.
- Status: Choose whether the user is active or inactive.
- Permission Section: Define the level of access the user will have.
- Resource Permission: Control access to specific modules or resources.
- Role: Assign a role to link responsibilities and permissions.
- Preferred Language: Select the default language for the user’s interface.
- Allowed Companies: Choose the companies the user can access.
- Default Company: Set the primary company for the user by default.
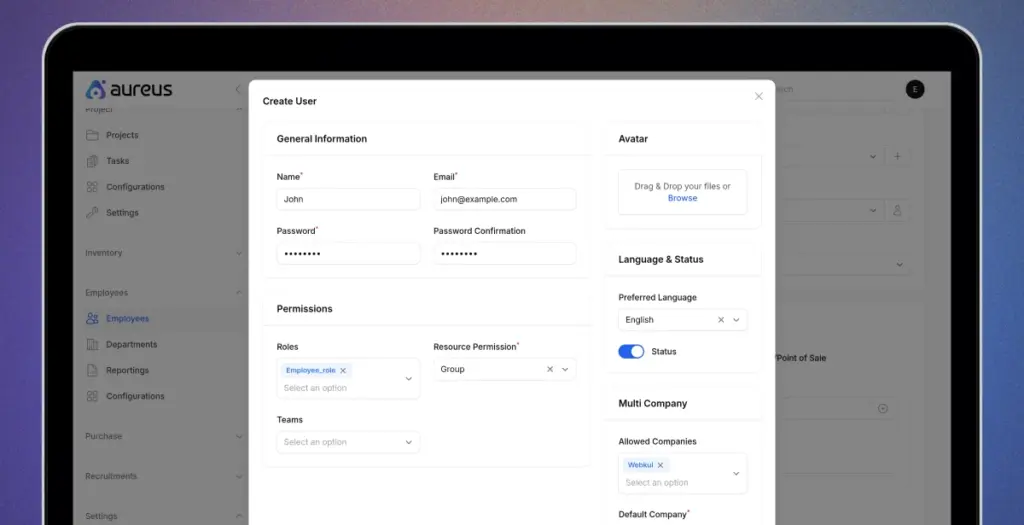
Click on create user button.
2) Additional Information: captures extra details about the user
- Primary Language: Set the main language the user will use.
- Additional Notes: Add any extra details relevant to the user profile.
- Notes: Record specific remarks or important information for reference.
Click on create button to create new employee.
User Account Log in:
- Users can access the system using their registered email and password.
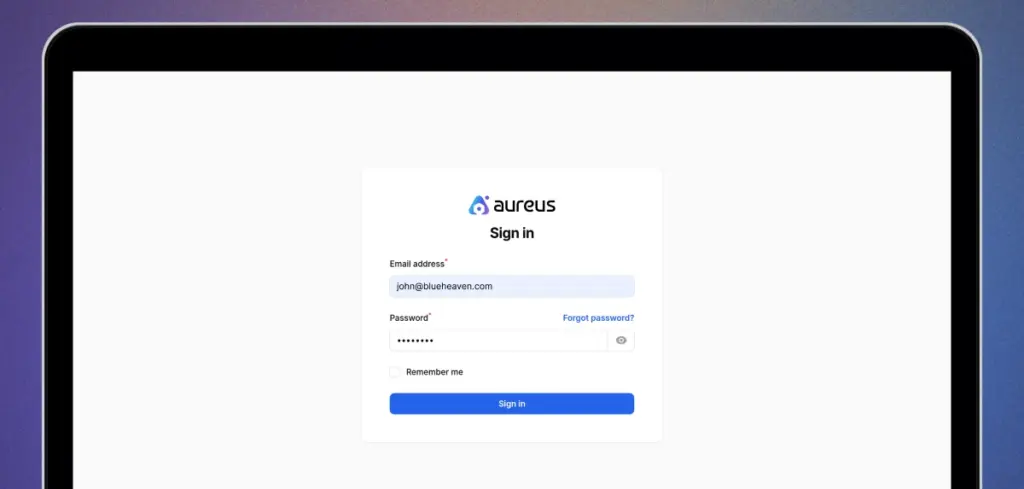
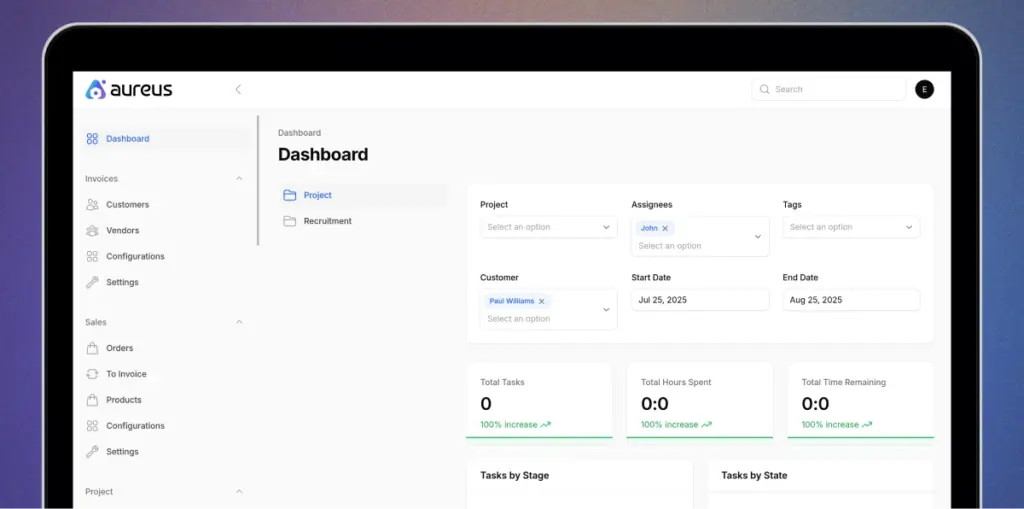
- Once logged in, a personalized dashboard appears, giving quick access to relevant user information.
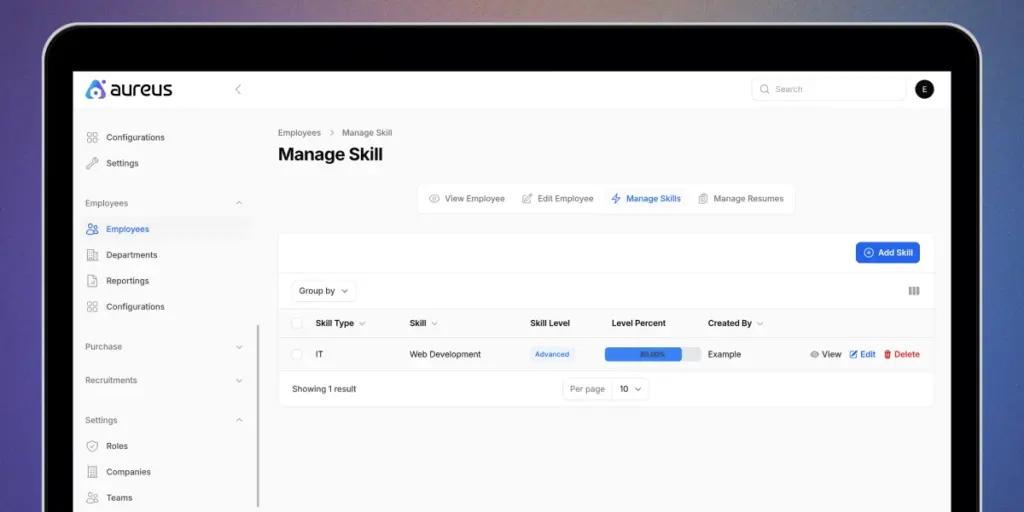
Manage Skill
Go to Add Skill, choose a category, define the skill name and proficiency level, and save.
This helps in mapping employee expertise for better project management System and team allocation.

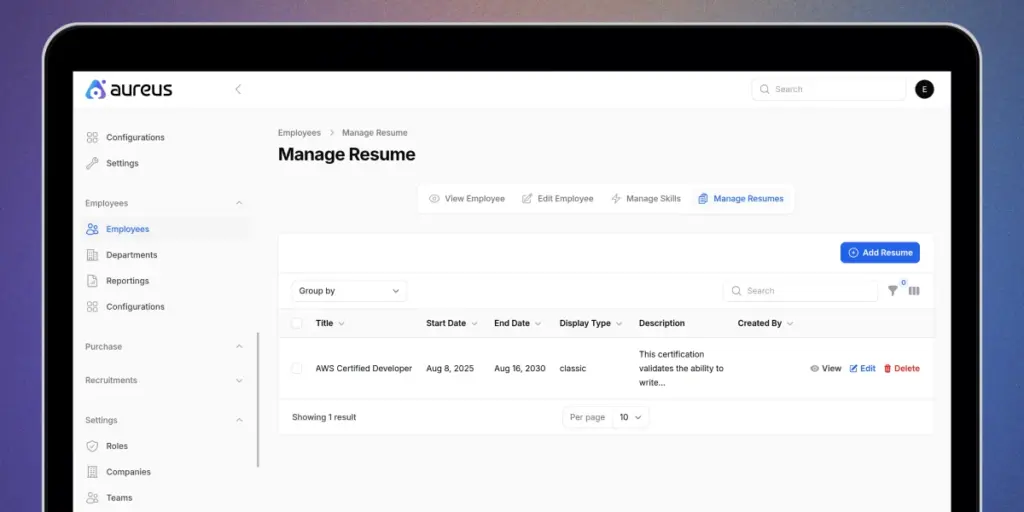
Manage Resume
Use the Add Resume option to upload employee resumes, specify type, duration, and display format.
This keeps a detailed record of career achievements and qualifications.
In Aureus ERP, an open source platform, creating an employee profile not only manages employee payslips, attendance, and performance but also allows configuration of roles, schedules, and skills to ensure smooth, compliant operations.
Effective Employee Management Strategies
- Centralize Employee Information
Keep all employee details like attendance, payroll, and performance in one system. This makes it easier to manage data and avoid errors. - Use Automation for Daily Tasks
Automate routine HR tasks such as attendance tracking, leave approvals, and salary processing to save time and improve accuracy. - Monitor Performance with Real Time Insights
Use reports and analytics to track employee performance. Real time data helps identify top performers and areas that need improvement. - Encourage Collaboration and Communication
Use integrated tools to connect teams, share updates, and manage tasks easily. Better communication leads to stronger teamwork and higher productivity. - Simplify HR Processes
Streamline workflows like onboarding, appraisals, and document management to make operations faster and more efficient.
Final Thoughts
Managing employees is not only about keeping records but about building efficiency and growth.
With Aureus ERP’s Employee Management module, businesses can maintain accurate data, ensure compliance, and gain insights to strengthen their workforce.
It also helps simplify daily HR tasks, improve team coordination, and create a more organized work environment.
Ultimately, it empowers companies to manage people smarter and focus more on growth.