The installation of Aureus ERP is a straightforward process that doesn’t require deep technical knowledge. It is Open Source ERP software that helps you manage your business operations like invoicing, product tracking, and customer data all in one place.
In this guide, we’ll walk you through each step to install Aureus ERP on your system. Whether you’re a developer or a business owner, you’ll be up and running in no time.
Installation of Aureus ERP
You can obtain the source code from the Aureus ERP GitHub repository in two ways.
- Download the source code directly from our GitHub repository, click the green “Code” button on the repository page, and choose “Download ZIP”.
- Clone the repository to your local development environment, Open VS Code, and press Ctrl + ~ to open the terminal, then run the command: git clone https://github.com/aureuserp/aureuserp.git .

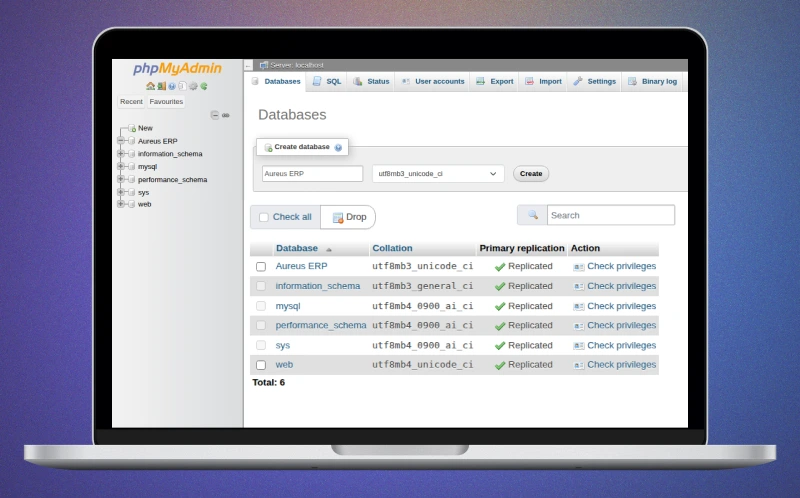
Create New Database
Using phpMyAdmin (GUI)
- Go to
http://localhost/phpmyadmin - Log in with your MySQL credentials.
- Click on the “New” tab.
- In the “Create database” field, create a database
- Click “Create” button.
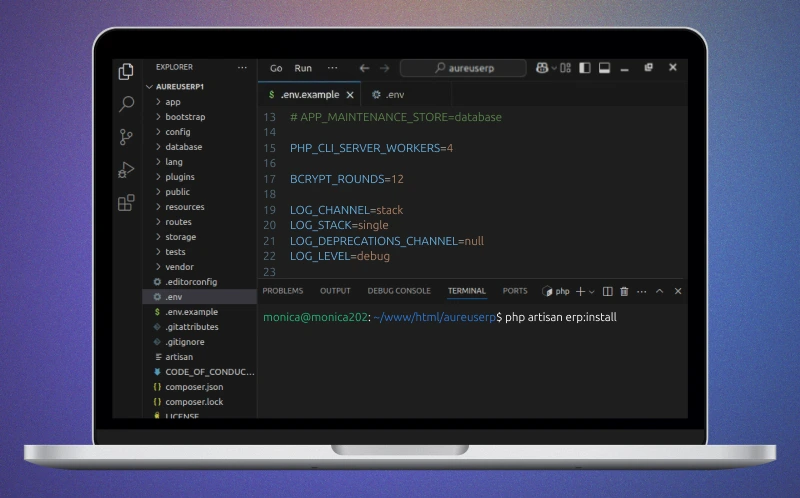
After cloning or downloading the Aureus ERP project, open Visual Studio Code, then go to File > Open Folder and select the root folder of the Aureus ERP project.
Inside the project, locate the file named .env.example. This file contains example environment configurations.
Then open the file and scroll to the database configuration section. Uncomment (remove # if present) And edit the following lines to match your database setup:
- DB_CONNECTION=mysql
- DB_HOST=127.0.0.1
- DB_PORT=3306
- DB_DATABASE=
aureuserp - DB_USERNAME=your_database_user
- DB_PASSWORD=your_database_password
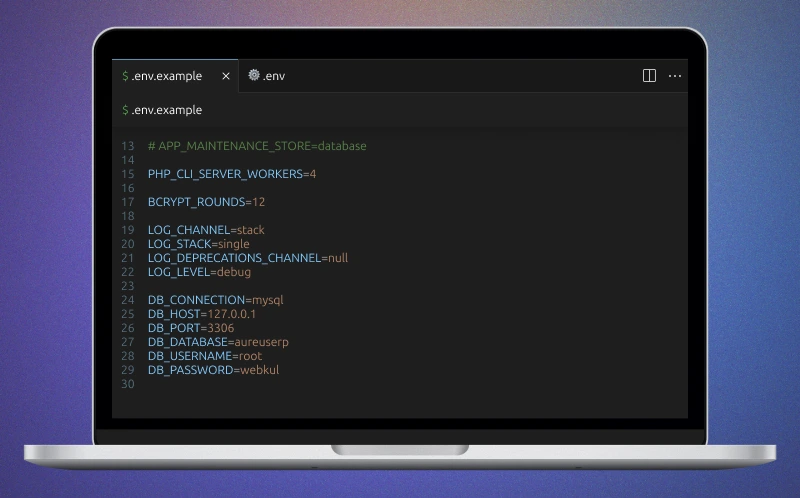
Replace your_database_name, your_database_user, and your_database_password With your actual MySQL database credentials. This step is essential to connect to your database during Installation and Runtime.
After configuring the .env.example file for database connection, you can run the following command in the Visual Studio Code terminal to set up the Laravel based Aureus ERP project:
composer create-project
When you execute this command, Composer installs the Laravel application and all necessary dependencies. As a result, it generates two important components in your project directory:
.envFile
This environment file holds configuration settings such as database connection details, app URL, and mail settings. If it wasn’t already created manually, Laravel will generate it during project setup by copying from.env.example.vendor/Directory
This folder contains all the PHP dependencies required by Laravel based ERP application. Composer generates it and includes packages like the Laravel framework, routing, database ORM, and more.
These components are critical for running and customizing the Open source Aureus ERP application on your local development environment.
Install Aureus ERP
Now run the below command.
- php artisan erp:install
After running the command php artisan erp:install In the terminal, the installation process will begin, setting up the database and seeding necessary data.
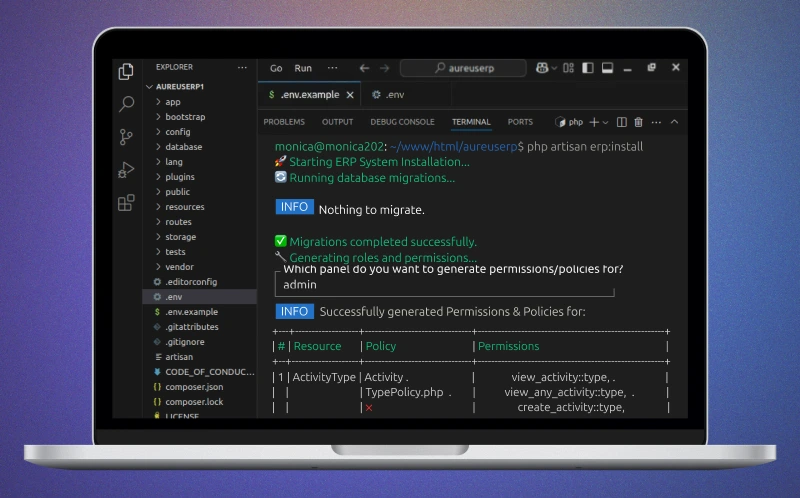
Once everything completes successfully, you will see a message displayed in the terminal saying:
“Installation is successful”.
This message indicates that Aureus ERP has been installed correctly and is ready for use.
2. php artisan serve
After successfully installing Aureus ERP, you can start the development server by running the following command in your project directory terminal to make an environment on the local server.
php artisan serve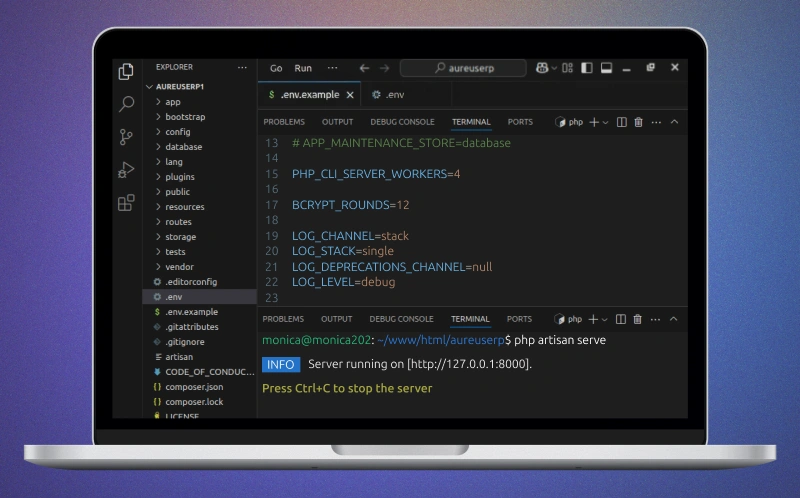
This command launches Laravel’s built-in PHP development server, Accessible at http://localhost:8000. You can open this URL in your web browser to access and test the Aureus ERP application locally.
The server will keep running until you stop it manually by pressing Ctrl+C in the terminal.
Frontend of Aureus ERP
Enter your username and password to access the dashboard. Use the default credentials provided during installation or the ones created via database seeding.
Email: [email protected]
Password: password
Once entered, click Sign-in to access the Aureus ERP system interface
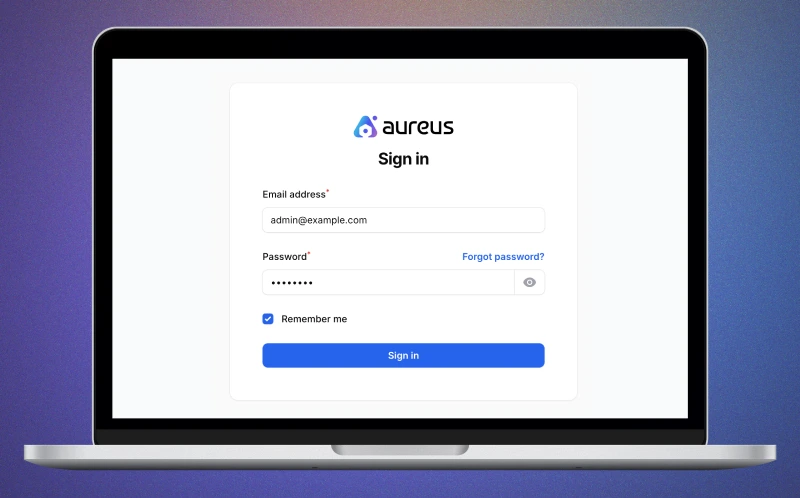
The default landing page will display the Dashboard along with access to the Settings module only. This limited view is typically due to initial role permissions set during the installation.
Congratulations! You have successfully installed and launched the Aureus ERP system on your local machine.
With the development server running, you can now access the ERP dashboard, explore its features, and begin customizing it to fit your business needs.
Installable Plugin
Installable plugins, optional modules, or extensions that can be added to the core of Open Source Aureus ERP system to enhance functionality without altering the main codebase.
These plugins allow businesses to customize the ERP system to their specific needs, such as adding features for payroll, CRM, inventory, or POS systems.
Typically, plugins are uploaded through the admin panel, then activated via the Settings. This modular approach keeps the system flexible, scalable, and easy to maintain
You can install these plugins as needed to extend system functionality.
| Module | Description |
|---|---|
| Blogs | Manage blogs |
| Accounts | Financial accounting and reporting |
| Contacts | Contact management for customers and vendors |
| Employees | Employees management |
| Inventories | Inventory and warehouse management |
| Invoices | Invoice generation and management |
| Payments | Payment processing and tracking |
| Products | Product catalog and management |
| Projects | Project planning and management |
| Purchases | Procurement and purchase order management |
| Recruitments | Applicant tracking and hiring |
| Sales | Sales pipeline and opportunity management |
| Timeoffs | Leave management and tracking |
| Timesheet | Employee work hour tracking |
| Website | Website for customer |
Installation and Management
Syntax:- php artisan <plugin-name>:install
Conclusion
Installing Aureus ERP is a simple and smooth process, even for those with basic technical knowledge. Once set up, it gives you a powerful platform to manage invoicing, product tracking, and customer data all in one place. With its Open Source flexibility, you can easily customize it to fit your business needs.
Now that you’ve completed the installation, you’re ready to explore, manage, and grow your operations efficiently with Aureus ERP.
Want to know more about “What Aureus ERP is?”
Thanks for reading this blog. Please comment below if you have any questions or
Hope it will be helpful for you, or if you have any issues, feel free to raise a ticket at our Support Portal

Be the first to comment.